Chef Emma here, and I’m about to share the party snack that saved me when I needed 30 treats in under an hour!
These Pokémon Rice Krispie treats are an absolute lifesaver for busy parents planning parties. When my son announced—three days before his birthday—that he wanted to bring treats for his entire class, I knew I needed something quick, easy, and themed. Enter these no-bake Poké Ball Rice Krispie treats that look impressive but take almost no time to make.
The first time I made these, I was amazed at how simple they were. Rice Krispies treats are already one of the easiest desserts you can make—just three ingredients and a microwave or stovetop. Adding the Pokémon theme requires nothing more than food coloring and a few minutes of shaping. No baking, no complicated techniques, no expensive ingredients.
When I brought these to the class party, the kids went absolutely wild. They immediately recognized the Poké Balls, and every single treat disappeared within minutes. The teacher asked for the recipe, and several parents messaged me wanting to know my “secret.” The secret? It’s literally the easiest thing I’ve ever made!
What makes these no-bake Pokémon treats so brilliant is their versatility. You can make them as simple or elaborate as you want. Basic round shapes work great, or you can get creative with sphere molds for 3D Poké Balls. You can make them the night before or whip them up an hour before the party. They’re budget-friendly, kid-approved, and everyone can help make them.
These treats are perfect for birthday parties, class celebrations, bake sales, game nights, or just because your little trainer deserves a special snack. They travel well, store easily, and always bring smiles.
For more creative Rice Krispie treat inspiration, check out Merry About Town’s collection of party food ideas, or explore AB Crafty’s guide to making adorable character-themed treats that kids absolutely love.
Table of Contents
Table of Contents
Summary For Pokémon Rice Krispie Treats
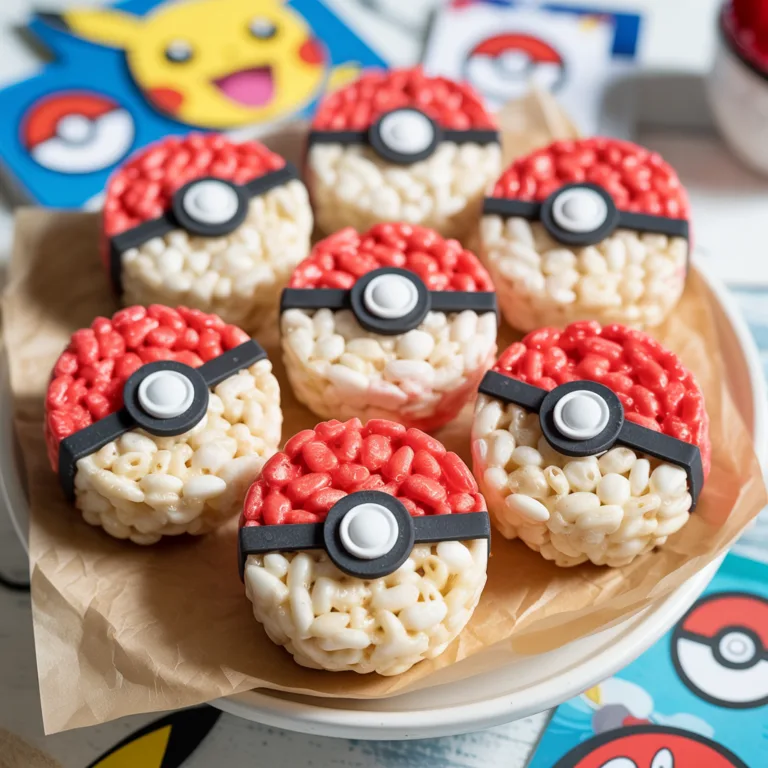
These Pokémon Rice Krispie Treats transform the classic no-bake dessert into adorable Poké Balls using simple food coloring and shaping techniques.
Made with just marshmallows, butter, and rice cereal, these treats come together in 30 minutes. Perfect for parties, bake sales, and quick celebrations!
Prep Time: 10 minutes
Cook Time: 10 minutes
Assembly Time: 15 minutes
Total Time: 35 minutes
Servings: 10-12 treats
Difficulty: Beginner-friendly
Pokémon Rice Krispie Treats (No-Bake Party Snacks)
Ingredients
Equipment
Method
- Line baking sheet with parchment paper. Grease hands with butter or cooking spray.
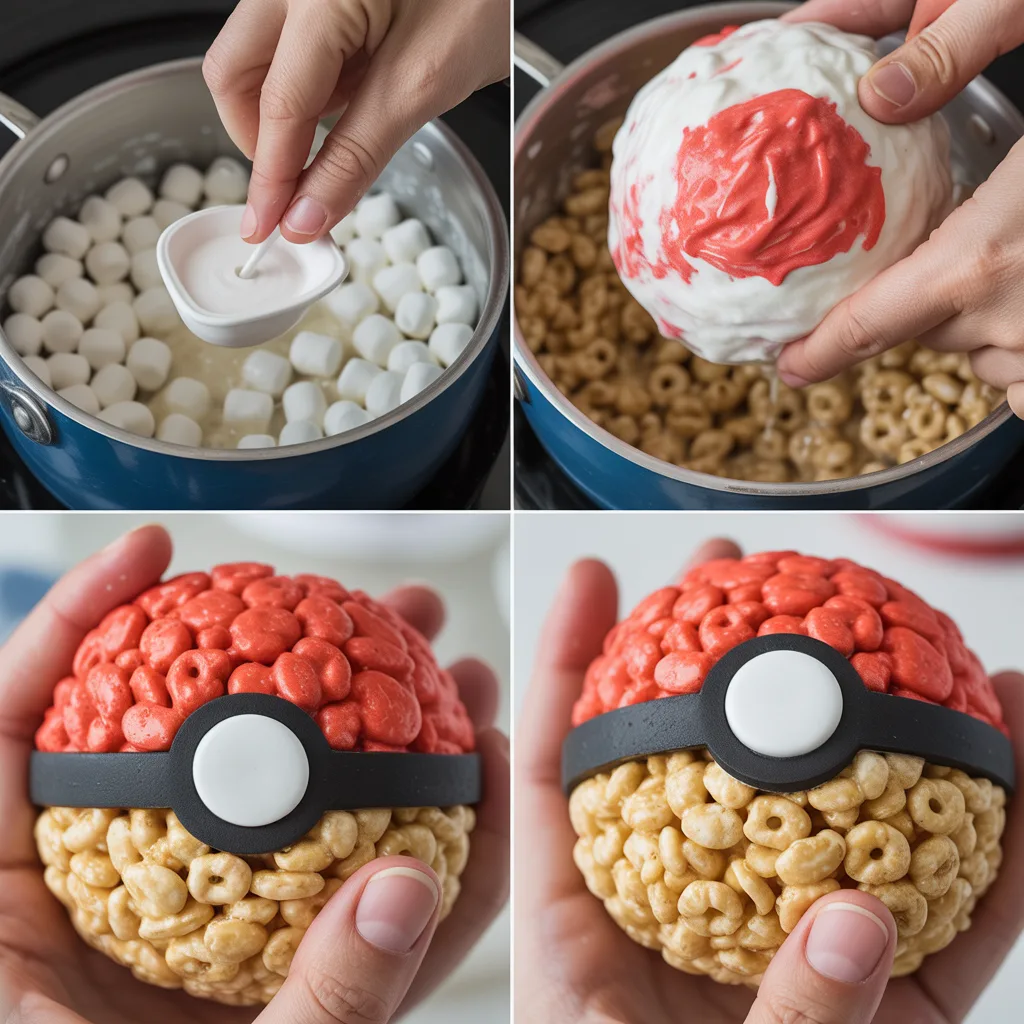
- In large saucepan over medium heat, melt 3 tbsp butter. Add 20 marshmallows (or 2 cups mini). Stir constantly until melted and smooth, 3-4 minutes. Remove from heat.
- Immediately add 3 cups Rice Krispies cereal. Stir quickly until evenly coated.
- With greased hands, scoop 2-3 tbsp mixture and form into dome shapes. Make 10-12 white halves. Place on baking sheet.
- In same saucepan, melt remaining 3 tbsp butter and remaining marshmallows. Remove from heat, add several drops red gel coloring. Mix until evenly red.
- Add remaining 3 cups cereal to red mixture. Stir until evenly coated and red.
- Form red mixture into dome shapes matching white halves. Place on baking sheet. Let both colors set 15 minutes.
- Press one white half and one red half together gently to form ball. Use tiny bit frosting as glue if needed.
- Roll thin black fondant strip, wrap around middle where red meets white. Add small black circle with white circle inside for button. Or pipe with black icing.
- Let set completely before serving or packaging. Store in airtight container up to 3 days.
Notes
Equipment For Pokémon Rice Krispie Treats
You’ll need these basic kitchen tools:
- Large saucepan or microwave-safe bowl – For melting marshmallows
- Wooden spoon or silicone spatula – For mixing
- Baking sheet – Lined with parchment or wax paper
- Butter or cooking spray – For greasing hands
- Small bowls – For dividing mixture
- Sharp knife – For cutting (if making flat treats)
- Optional: Sphere silicone mold – For 3D Poké Balls
- Optional: Round cookie cutters – For uniform shapes
- Rolling pin – If making flat pan version
Ingredients For Pokémon Rice Krispie Treats
For the Basic Rice Krispie Treats
- 6 tablespoons butter – Divided
- 10 oz (about 40) large marshmallows – Or 4 cups mini marshmallows
- 6 cups Rice Krispies cereal – Divided
- 1 teaspoon vanilla extract – Optional but enhances flavor
- Pinch of salt – Optional
For Coloring and Decorating
- Red gel food coloring – For the Poké Ball top
- Black gel food coloring – For details (or use black fondant/icing)
- White fondant or candy melts – For center button (optional)
- Red frosting – For “gluing” halves together (optional)
- Black fondant – For stripe and button (optional)
Optional Add-ins
- Sprinkles for extra decoration
- Yellow food coloring for Pikachu-themed treats
- Blue food coloring for Great Ball variation
Directions For Pokémon Rice Krispie Treats
Method 1: Simple Round Poké Ball Treats (Easiest!)
Step 1: Prep Your Workspace
Line a baking sheet with parchment or wax paper.
Grease your hands with butter or spray with cooking spray—this prevents sticking when shaping treats.
Step 2: Make White Rice Krispie Mixture
In a large saucepan over medium heat, melt 3 tablespoons butter.
Add 20 marshmallows (or 2 cups mini marshmallows) and stir constantly until completely melted and smooth, about 3-4 minutes. Remove from heat.
Step 3: Add White Cereal
Immediately add 3 cups Rice Krispies cereal to the melted marshmallow mixture.
Stir quickly but gently until all cereal is evenly coated. Work fast—the mixture sets quickly!
Step 4: Shape White Halves
With greased hands, scoop about 2-3 tablespoons of the white mixture and form into a ball, then flatten slightly into a half-sphere or dome shape.
Place on prepared baking sheet. Make 10-12 white halves. Set aside.
Step 5: Make Red Rice Krispie Mixture
In the same saucepan (or a clean one), melt remaining 3 tablespoons butter.
Add remaining marshmallows and stir until melted. Remove from heat and immediately stir in red gel food coloring—add several drops for vibrant color. Mix until evenly red.
Step 6: Add Red Cereal
Add remaining 3 cups Rice Krispies cereal to the red marshmallow mixture.
Stir quickly until all cereal is coated and evenly red.
Step 7: Shape Red Halves
With greased hands, form red mixture into dome shapes matching the size of your white halves.
Place on baking sheet. Let both colors set for about 15 minutes.
Step 8: Assemble Poké Balls
Once set but still slightly malleable, press one white half and one red half together gently to form a sphere or rounded shape.
Use a tiny bit of red frosting as “glue” if needed.
Step 9: Add Black Details
Roll out a thin strip of black fondant and wrap around the middle where red meets white.
Add a small black circle with a white circle inside for the center button. Or use black decorating icing to pipe details.
")
Method 2: 3D Sphere Poké Balls (More Advanced)
Step 1: Prepare Sphere Molds
Grease sphere silicone molds generously with cooking spray.
Step 2: Make Colored Mixtures
Follow steps 2-6 above to create separate white and red Rice Krispie mixtures.
Step 3: Fill Molds
While mixture is still warm and pliable, press white mixture into half of each sphere mold cavity.
Press red mixture into the other half. Create a small indent around the edge of each half where they’ll connect.
Step 4: Add Black Stripe Detail
Press a thin layer of black Rice Krispie mixture (made by adding black food coloring to a small amount) or black fondant into the indent on one half.
Step 5: Connect Halves
Carefully press both halves together while still in molds.
Press firmly to seal. Let set for 10-15 minutes, then carefully remove from molds.
Step 6: Final Details
Add black and white fondant circles for the center button.
Tips and Variations For Pokémon Rice Krispie Treats
Chef Emma’s Pro Tips
- Work quickly: Rice Krispie mixture sets fast! Have everything ready before you start, and work with warm, pliable mixture.
- Grease everything: Buttered or greased hands, spatulas, and molds prevent sticking and make shaping so much easier.
- Use gel coloring: Liquid food coloring dilutes the marshmallow mixture. Gel gives vibrant colors without changing consistency.
- Don’t press too hard: Rice Krispie treats should be slightly crispy, not dense. Press gently when shaping.
- Make ahead: These can be made 1-2 days ahead and stored in airtight containers. They actually stay fresh longer than most baked goods!
- Microwave method: Melt butter and marshmallows in microwave-safe bowl on high for 2-3 minutes, stirring every 30 seconds.
Delicious Variations
- Great Ball Version: Use blue food coloring for the top instead of red, add blue stripes with fondant
- Ultra Ball: Make yellow top with black accents for an Ultra Ball design
- Pikachu Treats: Color entire mixture yellow, shape into rounds, add Pikachu face details with icing
- Chocolate Poké Balls: Add 2 tablespoons cocoa powder to white mixture for chocolate flavor
- Peanut Butter: Mix in ½ cup peanut butter with marshmallows for extra flavor
- Larger Treats: Make fewer, bigger treats by doubling the mixture per ball
Serving Suggestions
These Rice Krispie Poké Balls are perfect for:
- Birthday party favor bags (wrap individually in clear bags)
- Bake sale items—always a hit!
- Class celebration treats
- Game night snacks for Pokémon fans
- After-school surprises
- Dessert table centerpiece at themed parties
- Quick weekend project with kids
- Lunchbox treats
Storage Instructions
Room Temperature: Store in airtight container at room temperature for up to 3 days. They stay fresh and crispy!
Refrigerator: Not recommended—refrigeration can make them hard and lose their crispy texture.
Freezer: Wrap individually in plastic wrap, then store in freezer bags for up to 6 weeks. Thaw at room temperature for 30 minutes before serving.
Nutrition Facts
| Nutrient | Per Treat (1 of 12) |
|---|---|
| Calories | 180 |
| Protein | 1g |
| Total Fat | 6g |
| Saturated Fat | 4g |
| Carbohydrates | 31g |
| Fiber | 0g |
| Sugar | 18g |
| Sodium | 140mg |
| Cholesterol | 15mg |
Nutrition information is approximate and based on 12 treats without optional decorations. Values may vary based on specific ingredients used.
")
Nutritional Highlights
These Rice Krispie treats are a fun, occasional treat perfect for celebrations and special occasions.
Rice Krispies cereal is fortified with vitamins and minerals including iron and B vitamins. While these treats are higher in sugar, they’re portion-controlled and perfect for parties where a little indulgence is part of the fun.
One great thing about making treats at home is knowing exactly what goes into them—no artificial preservatives or mystery ingredients like many store-bought options.
Dietitian Tips
- Portion awareness: One treat is a satisfying serving—they’re sweet and filling
- Add nutrition: Mix in ¼ cup of seeds (pumpkin, sunflower) or dried fruit for added nutrients
- Reduce sugar: Use sugar-free marshmallows to cut sugar content by about 30%
- Whole grain option: Use brown rice cereal for more fiber
- Balance the party: Serve alongside fruit, veggies, and protein options
FAQs
Can I use the microwave instead of stovetop?
Yes! Melt butter and marshmallows in a large microwave-safe bowl on high for 2-3 minutes, stirring every 30 seconds until smooth. Then proceed with adding cereal and coloring.
Why are my Rice Krispie treats hard?
You either cooked the marshmallows too long (they should just melt, not boil) or used too much cereal. Make sure to measure accurately and work with mixture while it’s still warm.
Can I make these nut-free for school?
Yes! This recipe is naturally nut-free as long as you use plain Rice Krispies cereal. Always check labels to ensure no cross-contamination if allergies are severe.
How do I get bright red color?
Use gel food coloring and add several drops—don’t be shy! Red is one of the hardest colors to achieve and requires more coloring than you’d think. Let colored mixture sit for 30 seconds before adding cereal.
What if I don’t have sphere molds?
No problem! The simple round/dome method works perfectly and looks adorable. You can also use round cookie cutters to cut circles from flat Rice Krispie treats pressed into a pan.
Can kids help make these?
Absolutely! Kids can help measure cereal, watch the melting process (from a safe distance), stir in the cereal with supervision, and definitely help with shaping and decorating. Great family activity!
Conclusion For Pokémon Rice Krispie Treats
These Pokémon Rice Krispie Treats prove that impressive party treats don’t have to be complicated, time-consuming, or expensive.
With just three basic ingredients and simple shaping techniques, you can create adorable Poké Ball treats that look like you spent hours in the kitchen. The best part? They’re actually fun to make, even for kitchen novices!
What I love most about these treats is how they eliminate stress from party planning. No preheating ovens, no waiting for things to bake, no complicated frosting techniques. Just melt, mix, shape, and done. In the time it takes to bake a batch of cookies, you can have a full tray of themed treats ready to go.
These no-bake party snacks have become my secret weapon for last-minute celebrations. Class party tomorrow? No problem. Bake sale on Friday? Done. Surprise treat for a Pokémon-loving kiddo? Twenty minutes and you’re a hero.
I encourage you to give these a try, even if you’ve never made Rice Krispie treats before. They’re practically foolproof, incredibly forgiving, and the kids can help with almost every step. Start with the simple round version to get comfortable, then branch out to 3D sphere molds if you’re feeling ambitious.
So grab that box of cereal, those marshmallows, and some food coloring. Get ready to create the easiest, quickest, most crowd-pleasing party treats that will make you look like a party-planning genius. These Poké Ball treats are ready to be caught—I mean made!
Blog and Social Links Footer
For more recipes: famillyrecipes.com
Follow me on Facebook and Pinterest