Chef Emma here, and I’m about to share the birthday cake that made me a legend in my son’s eyes!
When my youngest asked for a Poké Ball cake for his Pokémon-themed birthday party, I’ll admit I was intimidated. Those perfectly round, iconic red and white spheres look complex, right? But then I discovered the secret: you don’t need a sphere-shaped pan or complicated techniques. With two round cakes and some simple decorating, you can create a Poké Ball cake that looks incredible and tastes even better.
The first time I made this cake, I was nervous about getting the proportions right. Would the red and white halves look balanced? Would the black stripe sit perfectly in the middle? Would that iconic button in the center look recognizable? But as I carefully piped the buttercream and added the fondant details, I realized how forgiving this design actually is.
When I revealed the cake at the party, the kids went absolutely wild. They immediately recognized it as a Poké Ball, and my son’s face lit up with pride that his mom made something so cool. Parents kept asking if I ordered it from a professional bakery. The secret? It’s actually one of the easiest character cakes you can make!
What makes this Pokémon birthday cake so brilliant is its simplicity. The design is geometric and symmetrical, which means you don’t need artistic skills or steady hands for intricate details. It’s all about clean lines and bold colors—red, white, and black. Even if your lines aren’t perfectly straight, the iconic design is so recognizable that everyone will know exactly what it is.
This cake works perfectly for any Pokémon fan’s birthday, whether they’re 5 or 25. It’s classic, nostalgic, and instantly recognizable. Plus, you can customize the cake flavor to whatever the birthday person loves most.
For more creative Pokémon cake inspiration, check out Cookies Cupcakes and Cardio’s gravity-defying Poké Ball cake tutorial, or explore Adam Liaw’s beginner-friendly guide to making Pokémon-themed celebration cakes.
Table of Contents
Table of Contents
Summary
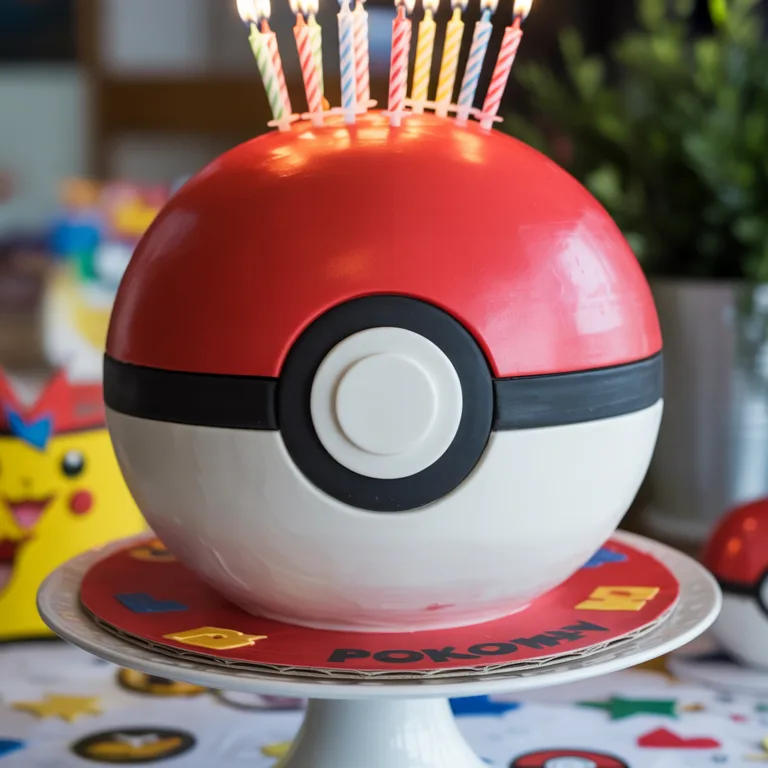
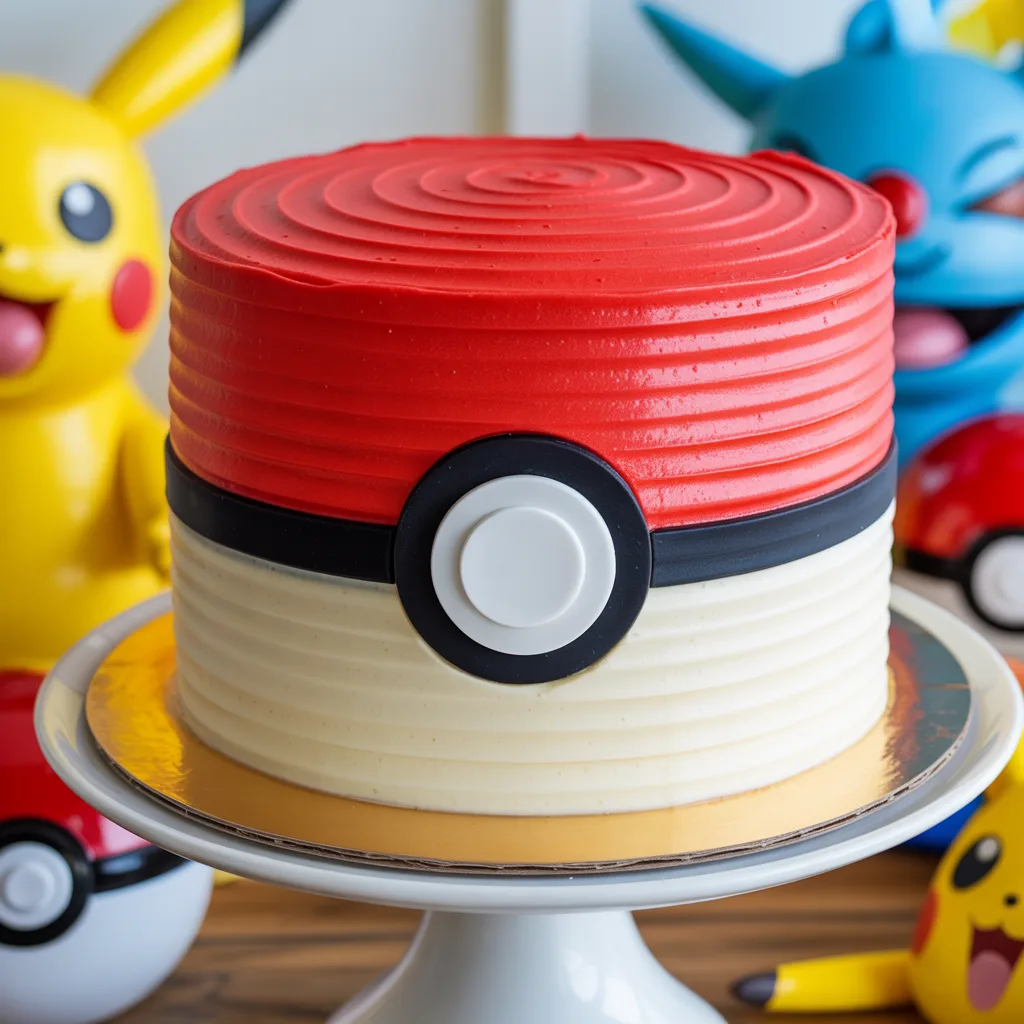
This Poké Ball Cake transforms two round cakes into the iconic Pokémon item using simple buttercream frosting and fondant details.
With bold red and white halves divided by a black stripe and center button, this cake is perfect for any Pokémon-themed birthday party. Easier than it looks and instantly recognizable!
Prep Time: 30 minutes (plus cooling time)
Decorating Time: 1 hour
Total Time: 1 hour 30 minutes (plus baking and cooling)
Servings: 12-16 slices
Difficulty: Intermediate (but very achievable!)
Poké Ball Cake (Easy Pokémon Birthday Cake Idea)
Ingredients
Equipment
Method
- Preheat oven to 350°F. Grease and flour two 9-inch pans. Prepare batter, divide between pans. Bake 25-30 minutes until toothpick comes out clean.
- Cool in pans 10 minutes, turn out onto racks. Cool completely (2+ hours or refrigerate overnight).
- Level tops of both cakes with serrated knife. Place first layer on serving platter. Brush with simple syrup if using.
- Spread ½-¾ cup white buttercream over first layer. Place second layer on top, flat side up. Press gently.
- Apply thin white buttercream crumb coat over entire cake. Refrigerate 20-30 minutes until firm.
- Divide remaining buttercream in half. Leave one half white. Add red gel coloring to other half until vibrant red.
- Using ruler and toothpick, mark center line around cake dividing where red and white will meet.
- Fill piping bag with white frosting. Pipe horizontal lines around bottom half. Smooth with offset spatula/bench scraper to center line.
- Fill clean piping bag with red frosting. Pipe horizontal lines around top half above center line. Smooth with spatula. Frost top red.
- Roll black fondant ⅛-inch thick. Cut strip 1-2 inches wide, 28-30 inches long. Wrap around center of cake where red meets white. Trim excess.
- Roll black fondant, cut 3-inch circle for center. Place on cake top. Roll white fondant, cut 2-inch circle. Place inside black circle for button.
- Step back, check edges are clean. Remove any powdered sugar or fingerprints with damp towel. Refrigerate until serving.
Notes
Equipment
You’ll need these baking and decorating tools:
- Two 9-inch round cake pans – For the layers
- Large serrated knife – For leveling
- Offset spatula – For smooth frosting
- Cake turntable – Makes decorating so much easier (optional but helpful)
- Large piping bag – For applying frosting
- Large round piping tip – Number 1A or 2A
- Bench scraper or cake smoother – For smooth sides
- Rolling pin – For fondant
- Circle cutters – Various sizes for fondant details
- Ruler – For measuring center line placement
- Toothpick – For marking guidelines
Ingredients
For the Cake
- 1 box white or vanilla cake mix (or your favorite homemade cake recipe for two 9-inch layers)
- Eggs, oil, and water – As called for on box
- Or use your favorite scratch cake recipe
For the Buttercream Frosting
- 2 cups (4 sticks) unsalted butter, softened
- 7-8 cups powdered sugar – Sifted
- ¼ cup heavy cream or milk – Plus more as needed
- 2 teaspoons vanilla extract
- Red gel food coloring – For vibrant red
- Pinch of salt
For the Fondant Details
- Black fondant – About 4 oz for the stripe and outer circle
- White fondant – About 2 oz for the button center
- Cornstarch or powdered sugar – For dusting
- Water or piping gel – For adhering fondant
Optional
- Simple syrup for brushing layers (keeps cake moist)
- Cake board or serving platter
Directions
Step 1: Bake the Cakes
Preheat your oven according to cake mix directions (usually 350°F).
Grease and flour two 9-inch round cake pans, or line with parchment paper. Prepare cake batter and divide evenly between pans. Bake according to directions (usually 25-30 minutes) until a toothpick inserted in the center comes out clean.
Step 2: Cool Completely
Remove cakes from oven and let cool in pans for 10 minutes.
Turn out onto wire racks and cool completely—at least 2 hours. For easier decorating, wrap cooled cakes and refrigerate overnight or freeze for 1 hour.
Step 3: Level and Stack
Using a large serrated knife, level the tops of both cakes, removing any domes.
Place the first cake layer on your serving platter or cake board. If using simple syrup, brush it over the cake layer to add moisture.
Step 4: Fill and Stack
Spread a layer of white buttercream frosting (about ½-¾ cup) over the first cake layer.
Place the second cake layer on top, flat side up. Press gently to ensure it’s level and secure.
Step 5: Apply Crumb Coat
Using white buttercream, apply a thin crumb coat over the entire cake—top and sides.
This doesn’t need to look perfect; it just seals in crumbs. Refrigerate for 20-30 minutes until firm.
Step 6: Divide Frosting
Divide the remaining buttercream frosting in half.
Leave one half white. To the other half, add red gel food coloring drop by drop, mixing thoroughly until you achieve a vibrant Poké Ball red. You may need quite a bit of coloring to get true red—don’t be afraid to add more!
Step 7: Mark the Center Line
Using a ruler and toothpick, mark the center line around the cake—the line that divides the red top from the white bottom.
Measure from the bottom to find the exact middle height, and mark dots all around the cake as a guide.
Step 8: Frost the Bottom Half White
Fill a piping bag fitted with a large round tip with white frosting.
Pipe horizontal lines of white frosting around the bottom half of the cake, following your toothpick guide. Use an offset spatula or bench scraper to smooth the frosting, working from bottom to top, stopping at your center line.
Step 9: Frost the Top Half Red
Clean your piping bag (or use a second one) and fill with red frosting.
Pipe horizontal lines of red frosting around the top half of the cake, starting just above your center line. Smooth with your offset spatula or bench scraper. Take your time to get the line between red and white as clean as possible.
Step 10: Smooth the Top
Frost the top of the cake with red frosting, smoothing with an offset spatula.
Use a turntable if you have one for easier smoothing. The goal is smooth, even surfaces with a clean division between red and white.
Step 11: Create Black Fondant Stripe
Roll out black fondant on a surface dusted with cornstarch or powdered sugar to about ⅛-inch thick.
Using a ruler and sharp knife or pizza cutter, cut a strip about 1-2 inches wide and long enough to wrap around the entire cake (about 28-30 inches for a 9-inch cake).
Step 12: Apply Black Stripe
Carefully wrap the black fondant stripe around the center of the cake, right where red meets white.
This covers the seam and creates that iconic Poké Ball middle band. Trim excess and smooth gently to adhere. Use a tiny bit of water if needed to make it stick.
Step 13: Create Center Button
Roll out black fondant and use a 3-inch circle cutter to cut a circle.
Place this in the very center of the cake top. Roll out white fondant and use a 2-inch circle cutter to cut a smaller circle. Place the white circle in the center of the black circle, creating the button design. You can add a tiny black dot in the very center using a small cutter or fondant tool.
Step 14: Final Touches
Step back and admire your work!
Check that all edges are clean and smooth. Use a damp paper towel to remove any powdered sugar or fingerprints from the fondant. Refrigerate until serving time.
")
Tips and Variations
Chef Emma’s Pro Tips
- Get true red: Red is one of the hardest colors to achieve in frosting. Use gel coloring, not liquid, and don’t be afraid to add quite a bit. You can also start with pink/rose and add red for deeper color.
- Chill between steps: Cold cake is so much easier to frost! Keep refrigerating between steps to make your life easier.
- Use a turntable: A rotating cake stand makes smoothing frosting infinitely easier and helps achieve clean, professional results.
- Measure carefully: The beauty of a Poké Ball is its symmetry. Take time to measure and mark the center line accurately before frosting.
- Smooth with hot water: Dip your bench scraper or spatula in hot water, wipe dry, and use to smooth frosting for ultra-smooth surfaces.
- Alternative to fondant: Don’t like fondant? Pipe the black stripe and center button with black buttercream using a large round tip. It won’t be quite as crisp but still looks great!
Delicious Variations
- Chocolate Poké Ball: Use chocolate cake instead of vanilla for chocolate lovers
- Great Ball Variation: Use blue for the top instead of red to make a Great Ball
- Ultra Ball: Use yellow for the top and add yellow accent lines to create an Ultra Ball
- 3D Sphere Cake: For advanced decorators, use a sphere cake pan to create an actual ball-shaped Poké Ball
- Mini Poké Ball Cakes: Make cupcakes or small layer cakes to create individual Poké Balls
Serving Suggestions
Complete your Pokémon party with:
- Pikachu cake pops or cookies arranged around the base
- “Pokémon Trainer” juice boxes or punch
- Yellow, red, and white candy in bowls
- Poké Ball cupcakes as an additional dessert
- Lightning bolt-shaped sugar cookies
- Fresh berries (Pokémon love berries!)
- Goldfish crackers labeled as “Magikarp”
Storage Instructions
Room Temperature: If your kitchen is cool (below 70°F), this cake can sit at room temperature for 4-6 hours during a party. Cover any leftovers.
Refrigerator: Store covered or in an airtight container for up to 5 days. Buttercream frosting keeps the cake moist and fresh.
Freezer: Freeze decorated cake on a baking sheet until solid, then wrap carefully in plastic wrap and foil. Freeze for up to 1 month. Thaw in refrigerator overnight, bringing to room temperature before serving.
Nutrition Facts
| Nutrient | Per Slice (1/14 of cake) |
|---|---|
| Calories | 495 |
| Protein | 3g |
| Total Fat | 23g |
| Saturated Fat | 14g |
| Carbohydrates | 72g |
| Fiber | 0g |
| Sugar | 60g |
| Sodium | 265mg |
| Cholesterol | 80mg |
Nutrition information is approximate and based on 14 servings with standard buttercream frosting. Values may vary based on specific cake mix and frosting recipe used.
Nutritional Highlights
This Poké Ball cake is a special occasion treat meant for celebrating birthdays and special moments.
Birthday cakes are about creating memories and bringing joy, not about nutrition counting. The cake provides energy from carbohydrates—perfect for kids running around playing at a party!
When you make cakes at home, you control the quality of ingredients—real butter, fresh eggs, and no artificial preservatives like store-bought cakes. That’s something to feel good about!
Dietitian Tips
- Portion awareness: Birthday cake is rich—smaller slices are satisfying and appropriate
- Balance the meal: Serve healthier party foods alongside cake (fruit platters, veggie trays, protein options)
- Reduce sugar: If making from scratch, you can reduce sugar in the cake itself by ¼ cup without major changes to texture
- Add fruit filling: Layer sliced strawberries or raspberry jam between cake layers for added flavor and nutrients
- Enjoy mindfully: Special occasion foods are meant to be savored and enjoyed as part of celebrations
FAQs
Can I use store-bought frosting instead?
Yes, though you’ll need several containers. You’ll need about 3-4 containers total—some white and some red (or buy white and color it). The texture won’t be quite as smooth as homemade buttercream, but it definitely works in a pinch!
What if I don’t want to use fondant?
Pipe the black stripe and button using black buttercream frosting in a piping bag with a large round tip. It won’t be quite as precise, but it still creates the iconic look. You could also use black candy melts or chocolate ganache.
How do I get the red and white division perfectly straight?
Measure carefully and mark with toothpicks before frosting. Use a turntable and bench scraper for smooth, even application. Chill the white layer before adding red on top—this prevents colors from mixing.
Can I make this cake ahead?
Yes! Bake cakes 2-3 days ahead and store wrapped at room temperature or freeze. Decorate the cake the day before the party and refrigerate. Bring to room temperature 1-2 hours before serving for best texture.
What size cake board do I need?
For a 9-inch cake, use a 10-inch cake board or larger. This gives you space around the cake for serving and transport. You can find inexpensive cake boards at craft stores.
Why is my red frosting looking pink?
You need more red gel coloring! True red is hard to achieve and requires quite a bit of coloring. You can also add a drop of black to deepen the red, or start with pink and add red gel for a deeper, more vibrant color.
Conclusion
This Poké Ball Cake proves that impressive character cakes don’t have to be complicated or require professional skills.
With simple geometric shapes, bold colors, and basic decorating techniques, you can create a cake that looks like it came from a fancy bakery. The iconic Poké Ball design is so recognizable that even if your lines aren’t perfectly straight, everyone will know exactly what it is!
What I love most about this cake is the joy it brings. Pokémon has been beloved for decades, spanning multiple generations. Whether you’re making this for a child discovering Pokémon for the first time or an adult who grew up with it, this cake creates a connection to something special.
This Pokémon birthday cake has become my go-to for any Pokémon fan’s celebration. It’s reliable, customizable to different flavor preferences, and always gets an amazing reaction. The best part? It actually tastes as good as it looks, unlike some elaborate cakes that sacrifice flavor for appearance.
I encourage you to give this a try, even if you’ve never decorated a character cake before. The design is forgiving, the techniques are straightforward, and the result is impressive. Start with clean, chilled cakes, take your time with the frosting, and don’t stress about perfection.
So grab those mixing bowls, fire up that oven, and get ready to create the birthday cake that will make you the hero of the party. This Poké Ball cake is ready to be caught—I mean served!
Blog and Social Links Footer
For more recipes: famillyrecipes.com
Follow me on Facebook and Pinterest